

What is this?
A workflow is a repeatable path for a specific job — sending a welcome message, qualifying a lead, routing a chat, or keeping contact data up to date. Build one clear workflow per job so each flow is easy to test and maintain.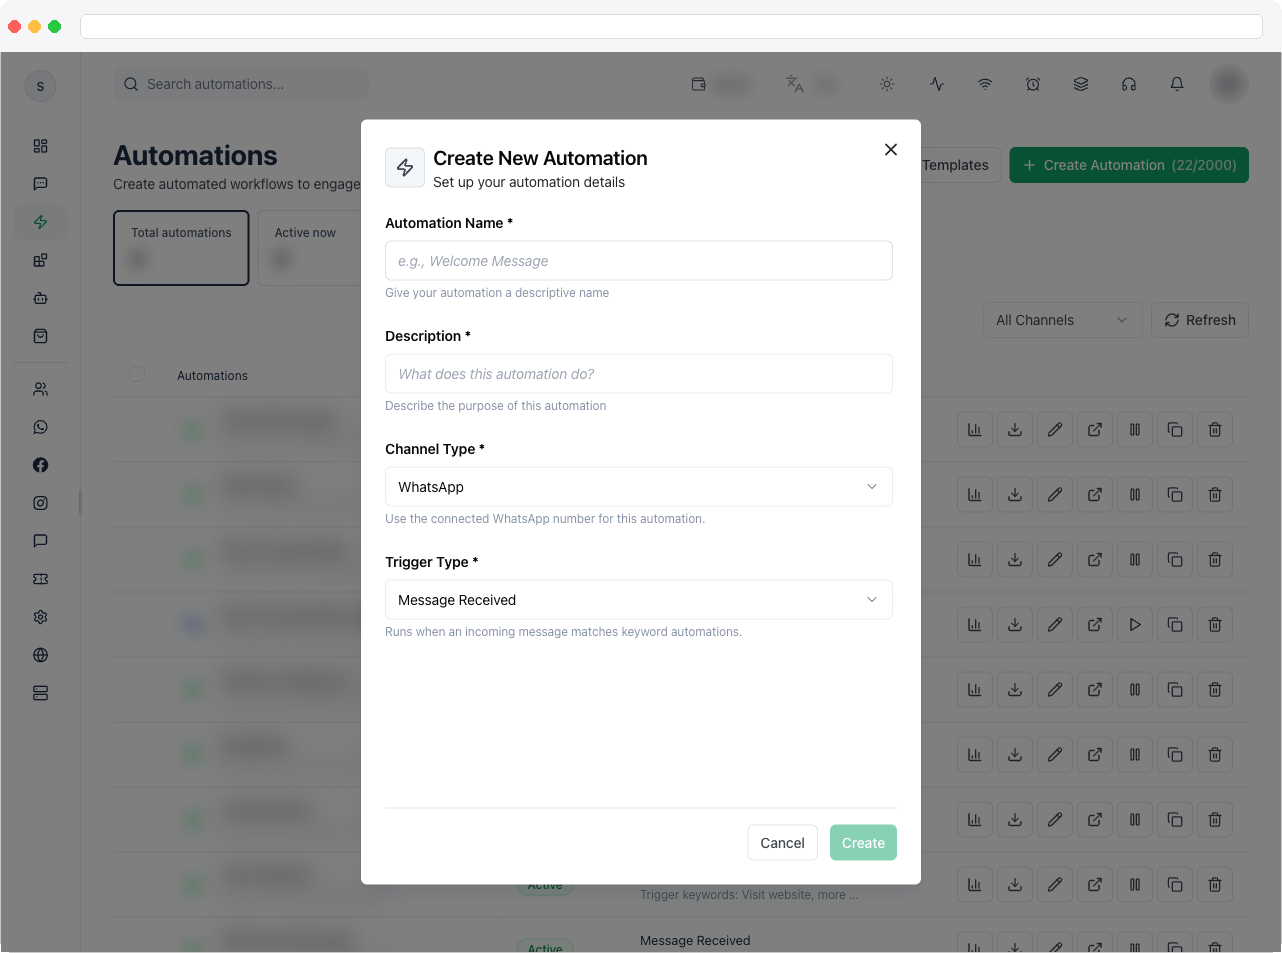
What can I do here?
- Create a workflow from scratch, from a template, or from an import
- Choose the channel and trigger, then design the flow in the visual builder
- Save the flow and activate it only once it’s tested
- the same inbound questions are consuming team time
- leads need consistent, structured qualification
- conversations must be routed to the right owner
- follow-ups and field updates should happen the same way every time
How to use it
1
Open Automation
Go to Automation in the sidebar and click Create Automation. The button shows how many automations you have used out of your plan’s limit, for example (3/10); when the limit is reached it is disabled and says Upgrade your plan.
2
Enter the details
In the Create New Automation dialog, fill in the four required fields:
- Automation Name — a descriptive name
- Description — what the automation is for
- Channel Type — WhatsApp, Instagram, Facebook, Telegram, or Webchat. A channel type your plan or licence doesn’t include is greyed out with a Not available tag and can’t be chosen.
- Trigger Type — what starts the flow. The list changes with the channel type, and a short description appears under the one you pick. See Triggers.
3
Build the flow
Click Create. The builder opens. Drag steps from the palette — messages, questions, conditions, delays, and actions — and connect them. See Work in the builder.
Other ways to start
- Templates — click Templates at the top of the Automation page to browse the template library (All templates, by channel, or Yours) and use one. The same window has a Start From Scratch button that opens the dialog above. See Use Templates.
- Import — click Import and paste an automation export (an exported
.jsonfile, or an XpressBot/XitFB flow export).
Create a workflow from a description
Instead of dragging steps yourself, you can describe the flow in plain language to the AI Assistant (or to an AI client connected over MCP) and approve what it proposes. For example: “Build a welcome automation for new conversations that asks for the customer’s name and tags them as a lead, then turn it on.”- The flow is saved as a draft — it is created inactive and doesn’t run until it is activated. Activating a flow shows a confirmation because it then runs for real customers.
- You can give a channel type (WhatsApp by default), a trigger — a keyword, a new conversation, or a contact field change — and the steps.
- It can use these steps: send text, buttons, list, media, call-to-action link, contact, location, an approved template, or a WhatsApp Flow; ask a question (text, number, email, phone, date, location, address, image, video, audio, or file); add or remove a label; set a field; create a note; wait; assign a team member; resolve the conversation; condition and multi-value branch; working hours; jump to a step; switch to another automation; HTTP request; and an AI reply.
- It can’t build payments, product or catalog steps, carousels, Google Sheets or Calendar steps, Shopify or WooCommerce steps, or sequences — build those in the builder.
- The flow is checked with the same rules as the builder, so it opens in the builder without errors, where you can review and refine it before activating.
- To change a draft later, the assistant replaces the whole flow. An automation that is on must be paused first, and one with runs in progress can’t be replaced.
Work in the builder
[SCREENSHOT: automation-builder-controls — The builder with the step palette on the left, the canvas in the middle with undo, redo, auto layout and full-screen buttons, and the settings panel on the right]- Palette (left). Lists the steps for this automation’s channel. Click a step to add it, or use Browse all in the bar under the canvas to open the full list even when the palette is collapsed. Collapse the palette to give the canvas more room, and expand it again from the Flow Builder button.
- Canvas (middle). Drag steps into place and connect them by dragging from one step’s output to the next. Use the zoom controls at the bottom left, Auto layout to tidy the steps automatically, Undo (Ctrl+Z), Redo (Ctrl+Shift+Z), and Full screen to hide the side panels. Click the pencil beside the flow’s name to rename it.
- Settings panel (right). Select a step to see and edit its settings; selecting a step always opens the panel. Click Collapse panel to shrink it to a slim bar that shows how many steps the flow has (for example “12 nodes”), and Expand panel to bring it back. The builder remembers whether you left it collapsed.
- Start step. Click the trigger block at the top of the canvas to edit the flow’s details and trigger settings.
Checks when you save
The builder checks the flow before it lets you save. If something is wrong it shows a message and doesn’t save, so fix the first problem it names and try again:
A carousel also needs between 2 and 10 cards. You also can’t draw a line into a step that is missing required fields — configure that step first.
Use contact data in a workflow
Every run belongs to a contact — the customer who triggered it, or one created during the flow. Their data is already available as variables, so the workflow doesn’t need to ask again:- Identity — name, phone number, email
- Labels — segments such as
Hot Lead,VIP, orSupport - Custom fields — values collected by ask steps, WhatsApp Flows, or imports (for example
city,budget, orpriority). See Custom Fields. - Source and assignment — the channel the contact came from, the assigned teammate, and their status
- Trigger context — the message, webhook payload, or change that started the run
Good practice
- Name workflows so any admin understands them at a glance:
WA - Lead Intake → QualifiedbeatsTest flow 3. - Test on the correct channel with realistic data before marking the flow active. See Manage Live Flows.
Troubleshooting / Technical Notes
- “Name required” or “Description required.” Both fields must be filled in before you can continue.
- “Invalid automation JSON.” The import text isn’t a valid export. Paste the complete file contents.
- You can’t create another automation. The button shows “Upgrade your plan” when your plan’s limit is reached.
- I can’t save the flow. Read the message the builder shows — it names the first thing to fix. The table under Checks when you save explains each one.
- A channel type is greyed out as “Not available.” Your plan or licence doesn’t include it. Contact your administrator.
- I need to type a very short delay. The Delay step now accepts seconds — see Logic & Timing.